
wasp removal can be a tricky task. It requires quick thinking and the right strategy in order to get the job done safely and efficiently. When faced with a wasp nest, it’s important to know what you’re up against and have the right tools to manage the situation. This guide will help you understand how to remove a wasp nest and minimize your chances of getting stung.
Identifying Wasps
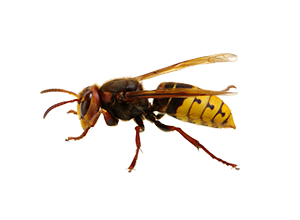
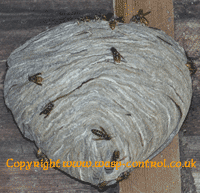
The first step to take when dealing with a wasp nest is to identify which species of wasps you are dealing with. There are many different kinds of wasps, but the two common in North America are paper wasps and yellowjackets. Paper wasps are brown and black in color, and build nests made out of paper-like material. Yellowjackets are larger in size, more aggressive, and their nests are built from chewed wood pulp.
Preparing for Wasp Removal
Once you have identified the type of wasp, it’s time to start preparing for the removal process. The most important thing to remember is to never attempt to remove a wasp nest without the proper protective gear. You should always wear long sleeves, long pants, gloves, and a hat or hood when removing a wasp nest. Additionally, you should consider using insecticide to help reduce the number of wasps.
Location Matters
When it comes to removing a wasp nest, the location of the nest has a huge impact on the process. If the nest is located in a difficult-to-reach area such as the eaves of your house or in a tree, it may be best to call a professional pest control service. On the other hand, if the nest is located in an open, exposed area such as a garden or shed, it can be removed relatively easily.
Timing Is Everything
Timing is also critical for wasp nest removal. Wasps are most active during the day, so it is best to wait until nightfall to begin the removal process. During this time, the majority of wasps will be inactive, allowing you to approach the nest without being bothered. It’s also important to pay attention to the weather as strong winds and rain can cause the wasps to become agitated.
Removing the Nest
To remove the nest, you will need to carefully scrape it off its supporting surface with a wide, flat tool such as a putty knife. This should be done slowly and cautiously to avoid agitating the wasps. Once the nest has been detached, it should be placed in a durable container with a tight-fitting lid and disposed of immediately.
Sealing the Entry Point
After the nest has been removed, it is important to take steps to ensure that the wasps won’t return. This can be done by sealing any entry points into the area where the nest was found. This could include filling in cracks and crevices, installing screens or traps, and replacing damaged siding or shingles.
Professional Assistance
If the wasp nest is large or the entry points can’t be adequately sealed, enlisting professional assistance may be necessary. Pest control services can assess the level of infestation, use specialized tools and techniques to safely remove the nest, and provide advice on ways to prevent future infestations.
Wasp nest removal can be a challenging and intimidating task, but with the right information and equipment, it can be handled effectively and safely. By following the advice in this guide, you can remove a wasp nest quickly and without incident.